Trying to achieve a fabric look.
Update: I'm posting shaders here now.
Trying to achieve a fabric look.
Update: I'm posting shaders here now.
I extracted the shader running code from glsl-preview, and packaged it as an npm package called shader-canvas.
This means I can easily write a shader in Atom and pop it into a webpage!
I recently took over maintenance of the Atom editor package glsl-preview. I love this tool!
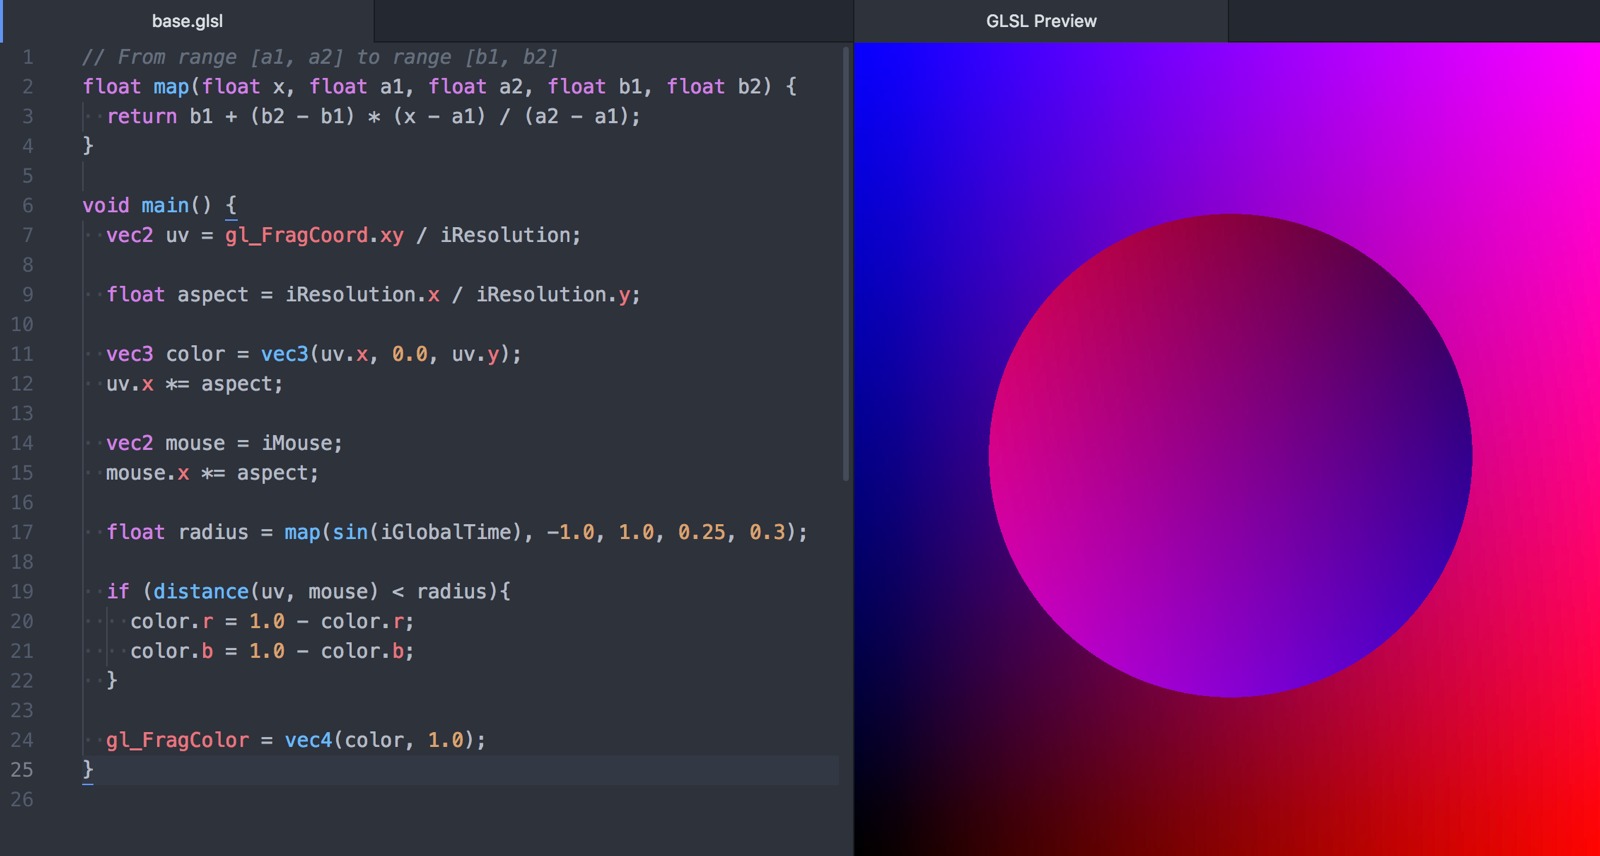
The code is here: https://github.com/fordhurley/atom-glsl-preview.
I recently made a tool for myself that I think has succeeded where so many of my other side projects have failed: actually saving me time even after factoring in the time it took to build it. I gave it the boring name "GLSL Grapher," because it graphs the output of functions written in GLSL. Here's my explanation for why this is useful, taken from the project page:
Developing and debugging shader code is a uniquely difficult problem. Graphing a function in a single dimension is a useful tool in the debugging toolset, but isn't always the easiest thing to do. For one, typical graphing tools all require you to translate your shader code into another format. This allows you to graph the output of your actual code.
I'm hosting the tool at /glsl-grapher/. The source code is available on Github.
Curious about the state of OpenGL development in Golang, I decided to experiment by cloning a somewhat simple game. My inspiration is the game splix.io, which itself is based on the classic arcade game Qix.
Here's a video of the gameplay:
A simulation of the pendulum waves demonstration, using THREE.js.
Read more…Today, I'm pushing out a rewrite of this site that's been brewing for a while. The site is now static and hosted by S3. It depends on Mako for templating, Less for CSS, Fabric for automation, and Misaka for Markdown rendering. Content (like this post) is stored in YAML/Markdown files, which are parsed with Python. Codeship is used to test, build, and continuously deploy the site. So far, I love it!
I stumbled upon a surprising behavior while using Celery and random number generators in numpy recently, and decided to write up how I dealt with it in hopes that someone else will find this before spending as much time as I did to figure it out.
Here's a small example illustrating the problem. First, we have a celery task
that picks a random number using numpy.random.randint:
from celery import Celery
import numpy as np

app = Celery('tasks',
             broker='redis://localhost:6379',
             backend='redis://localhost:6379')

@app.task
def pick_random(high):
    return np.random.randint(1, high)
Calling this task will return a random integer between 1 and high, inclusive.
Save the file as tasks.py. Here's the script I used to run it (saved as
randomtest.py):
#!/usr/bin/env python
import tasks

def expected_collisions(n, d):
    # http://en.wikipedia.org/wiki/Birthday_problem#Collision_counting
    n = float(n)
    d = float(d)
    return n - d + d * (((d - 1) / d) ** n)

def main():
    num = 100
    high = 100

    results = set()
    for i in range(num):
        task = tasks.pick_random.delay(high)
        n = task.get()
        results.add(n)

    actual_unique = len(results)

    expected_unique = num - expected_collisions(num, high)
    print 'Unique results:'
    print 'Expected: %.1f' % expected_unique
    print 'Actual: %d' % actual_unique

if __name__ == '__main__':
    main()
This script will call the task 100 times in a row, adding the returned values to
a set, so that we can keep track of only the unique results. It also
calculates the expected number of unique results we should get, assuming our
random number generator is working correctly (see the Birthday Problem).
I started the celery workers in one terminal window with:
$ celery worker -A tasks
And ran the script in another with:
$ python randomtest.py
The output was:
Unique results:
Expected: 63.4
Actual: 16
So, based on probability, picking 100 different numbers from a pool of 100, we should have received about 63 unique numbers, but for some reason we only got 16. How could this be?
Read more…If you store files on S3, sharing them with someone who doesn't have access can be a little painful. One way to do it is temporarily make the file public, but then you need to remember to make it private after the other person has downloaded it.
The AWS docs explain a way to pre-sign a link that will be usable only for a short time, and only for the specific file. This is a pretty cool mechanism. It's almost like a "this message will self-destruct in 10 seconds". Here's a quote from the AWS docs about the idea:
All objects by default are private. Only the object owner has permission to access these objects. However, the object owner can optionally share objects with others by creating a pre-signed URL, using their own security credentials, to grant time-limited permission to download the objects.
I recently wrote a little command line tool to make generating these links as easy as possible. The name is suuuper creative: s3url. You can find it on Github.
First, you need your AWS credentials, the access key ID and the secret access key. I place these in my .profile and export them:
export AWS_ACCESS_KEY_ID=AKIAIOSFODNN7EXAMPLE
export AWS_SECRET_ACCESS_KEY=wJalrXUtnFEMI/K7MDENG/bPxRfiCYEXAMPLEKEY
Then, I upload the file I want to share, using the AWS S3 command line interface:
$ aws s3 cp path/to/file.txt s3://my-bucket/file.txt
upload: path/to/file.txt to s3://my-bucket/file.txt
The destination of that cp command can be given to s3url, and it will generate a signed URL for that object:
$ s3url s3://my-bucket/file.txt
https://my-bucket.s3.amazonaws.com/file.txt?Signature=d3HZ5yFfR6a%2FXfSHdZ%2B%2FI6kWENU%3D&Expires=1397391353&AWSAccessKeyId=AKIAIOSFODNN7EXAMPLE
By default, the URL will last for 24 hours. If you want to change the expiration time, add an -e argument:
$ s3url -e 15m s3://my-bucket/file.txt
https://my-bucket.s3.amazonaws.com/file.txt?Signature=gatuFFnQhXO2%2BUE8GZvGzFmU%2BOU%3D&Expires=1397306075&AWSAccessKeyId=AKIAIOSFODNN7EXAMPLE
It's available on PyPI, so installing it's as easy as:
$ pip install s3url
Check out the README for more details.